Books I have read and recommend.

Wednesday, July 18, 2012

Battle Of Stansburg. Another Maurice AAR

 Hi Guys
I recently played another game of MAURICE and thought I would share.
I used my 1806 Prussians again as substitutes for my 'yet to be completed' imagi-nation, Electorate of Clements Unt Edwarts.
Stan played with a rebuilt Free State of Northern Virginia.
The battlefield was as follows.
On my right there were two lage cultivated fields (rough ground) with a long wall running along the southern edge of the field nearest to my center. This field had a small hill (Potato Hill) next to it. Running down the center of the battlefield was a road running from the north to the small hamlet of Stansburg. A road branched off heading west to the Apple Orchard.
Further north was a large hill (Observer's Mound) and on the road heaing north was the village of Puckavonyal.
I was tasked with defending.
My deployment can be seen above and below.
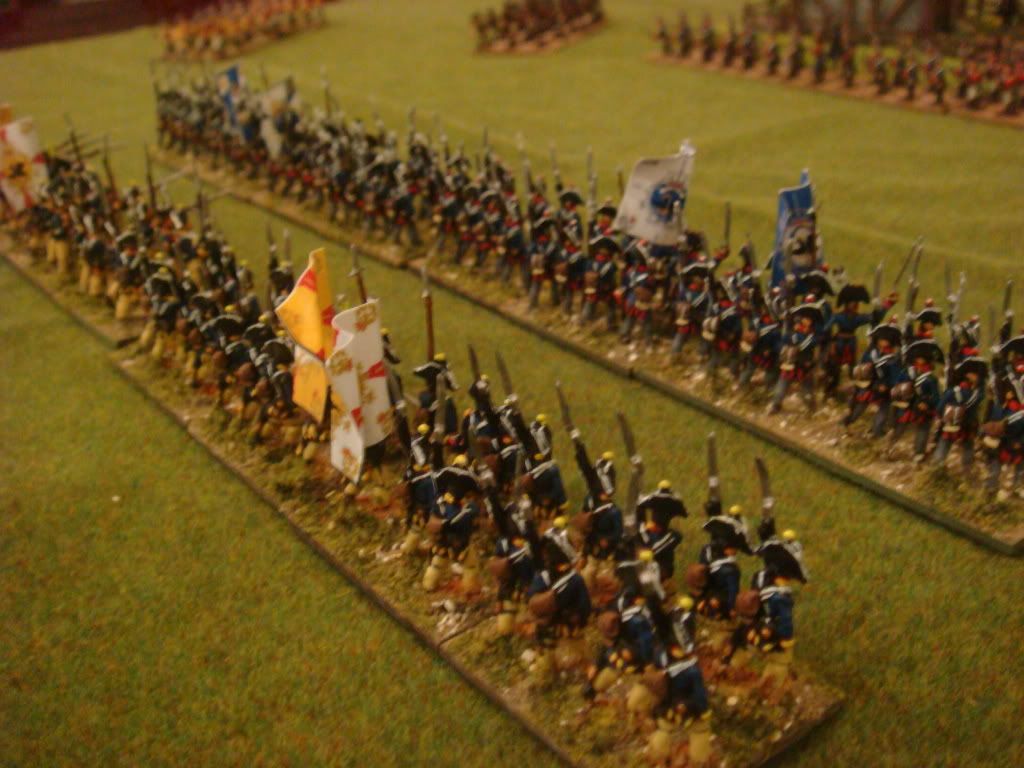
BELOW: My left flank. All my cavalry massed in one force making up my Left Wing Command, with the Jagers and 3 Regiments of foot making up my Center Command.

BELOW: My right flank. 3 Regiments of infantry, with one deployed behind the Tall Wall, one Regiment on Potato Hill and a thrid Regiment deployed behind the Grand Battery of my Artillery Command.

 BELOW: My notables. They achieved nothing in this batte, 'sigh'.
ABOVE: My notables for this battle.
BELOW: Stan deployed in three commands. Four infantry regiments on his left flank, including a Regiment of Mercenary Militia. In the center he massed four Infantry Regiments including his Govenor Of Free Virginian Hessian Guards plus a regiment of irregulars. Between these two Infantry commands were his tows Batteries of Artillery.

BELOW: On Stan's right he deployed his three Regiments of Horse.
Let battle begin.
A cold breeze swept across the valley floor.
The Elector is talking with his Regimental Commanders and RSMs.
"Today ve defend. I'm confident we we send ze Virginians packing like ve did last time ve met.* They have rebuilt their army however, and have worked on their Drill".
The commander of Prinz Peter's Cuirassiers spoke up;
"It will take more than fancy foot work to best us Sire"!
The Elector nodded as he looked past his officers towards the enemy forming up in the distance.
"We will let them come on and smash themselves on our Guns and muskets. Return to your regiments and prepare your men for the dance".

* See previous AAR HERE

Stan opened proceedings with a co-ordinated move by his left Infantry Command and right Cavalry command. I countered by wheeling my Grand Battery to lay on the advancing Infantry. A load groan was heard to come from the mercenary Militia as the realised they would be the fist the endure my gunners wrath.
BELOW: The Grand Battery wheels out in preparation to lay waste to the enemy infantry.
ABOVE: My artillery prepares to fire.
BELOW: Boom boom boom booom,......... boom boom boom! Within short order 3 disruption is inflicted on the mercenaries as roundshot plowes into them.

BELOW: Stan's left wing of 4 Regiments advances on my right. 

"Hmmmm, what's he at? Surely he doesn't hope to roll my right flank? the rough ground and wall will surely cause him no end of grief. I'll have shot him o shreds before he can hope to cross bayonets with me".
BELOW: Even with his 'OBLIQUE' national characteristic Stan's infantry still picked up some distruption due to the terrain. My mased cannon also added to his woes.
"He appears to be trying to get around my right. Foolish man! Now he's in range of my muskets. Pour it into them mine kinder"!!!!
BELOW: The first Volley phase of the battle. My muskets crackle and the mercenaries are reduced to a fleeing mob.
An ADC rides up to the Elector:
"Sire, the enemy have mangaed to get a Regiment pass the Long Wall"
"Ja, I see" replies the Elector, "But there seems to be some confusion in there ranks,.. look the lead Regiment is withdrawing through their own supporting Regiment! HA, das is gut. Dunderklompen"!
Below: I play a "CONFUSSION" card and Stan's attack on my right falters.
The faltering attack on my right seemed to be the que for Stan to advance in the center. Leaving his Artillery to the rear, his cetral Infantry command swept forward. (SEE BELOW)
Soon the two central commands were exchaging volleys and another one of Stans Regiments were soon feeling the hurt thanks to some hot work by my Infantry. My "LETHAL VOLLEY" characteristic was doing greater execution than Stans musketry.
BELOW: The fire-fight erupts in the center.

BELOW: More card trickery. The result was mass disruption on Stan's second infantry Regiment.
Stans Guards and the Infantry on their left flank now charged with the bayonet. The hand to hand was brutal, but my Regiments held their ground and then delivered more hot lead.
This proved too uch for the infantry on the left of Stan's Guards and they fled to the rear.
With the loss of the leading Infanrty regiment Stan moved up a 2nd line egiment into the gap. and more volleys were exchanged.
BELOW: The Fog Of War:
Stan's Guards seemed on the verge of breaking, but their Commanding Officer stepped forward to inspire his men:
"Die Hard Hessians! Look, your Govenor is watching you"! With that a mighty cheer went up and they delivered a crashing volley that broke my Regiment before them.
The Elector was not happy:
"Plug the gap! send forword Von Zillmann's Regiment; SCHNELL"!
BELOW: Von Zillmann's Regiment advances into the gap.

"That should fix th,........ WHAT! What is this"?!?!
How things can change. Suddenly two more volleys and the central command was destroyed by volleys and the bayonet. Two batteries were soon over run and moral collapsed as the Hessian Guards charged into Stansburg.

ABOVE and BELOW: It's all over. The Govenor's Hessian Guard storm into Stansburg. The Elector orders a withdrawal. Bitter defeat.
In the end Stan's army was 3 moral point from breaking, so it was a very close game.
What did I learn.
Place supporting units directly behind the regiment they are tasked to support.
Irregular units make good garrisons (well, I suspect they would).
Leathal Volleys is only a good characteristic if you actually score HITS. It's nice to be able to roll failed disruption, but it's no use to you if you can't score hits,...
This game confirms what I already knew about MAURICE. It's really really good fun.
All over in under two and a quarter hours.
Comments wlcomed.
Cheers

Sunday, June 17, 2012

1st Gunners Wargaming give away competition

Hi Guys
Exciting news!
My good bubby Dan Dunbar of "Gunner's Wargaming" is running hs first competition.
SEE BELOW:

1st Gunners Wargaming give away competition
Hi guys
The Gunners Wargaming give away will be held yearly on my birthday, 15 June
I was trying to decide what would be a good prize for a give away, when I thought the best prize is something tailor made for the individual, and something you can't get anywhere else, so my prize will be, I will collaborate with the winner to use my limited skills to create a group of characters/command stand/vehicle's/small unit, for your army, to your specification, using figures/models from my collection, and my conversion/painting skills.
So you choose the scale, period and force and if I have it in my collection I will make something for your collection.
So how big will the group of figures be? upper and low limit will be determined by how much work will be needed for each figure, and how many I have available in my collection.

15mm and 1/72 figs - 8-16ish
28mm figs - 6-12ish
15mm vehicles - 1-3
1/72nd vehicles - 1-2
28mm vehicles - don't ask, I don't have any.
Mixed - or you may want a mix of a vehicle with some crew - 1 vehicle + 4-6 crew.

I don't have a collection that covers all scales and periods, but I do have a big enough collection that I should be able to cater for most needs, some ideas could be -
1) 28mm Characters for Sharpes practice, e.g. Richard Sharpe
2) A group of 15mm Fantasy adventurers or war band
3) A squad of 15mm Space Marines
6) 1 or 2 Mechs
7) A center piece for a WWII unit

So to be eligible to enter you must
1) add a reply to this post with, scale, period, force, and make up of what you would like.
2) Follow my blog publicly.
3) post a link to this post and pimp my blog on your own blog if you have one.

Good Luck.
SO WHAT YA WAITING FOR?
GET THERE: GUNNER'S WARGAMING
BELOW:
Just a sampe of Gunner's work. AB Miniatures Bavarians and Wurtemburgers

Tuesday, June 12, 2012

WINTERCON 12. More DBA Fun!


Hi All!
Another opportunity presented itself to get some DBA games in.
BELOW: Busted chariots fixed while you wait. Just what I need! (Stephen Hopkins' Baggage Element)

I travelled to our nation’s capital, Canberra to play in the DBA comp being held as part of the Canberra Gaming Societies ‘WINTERCON’ event.
As usual I took my Trojans along. I really must get some other 15mm DBA armies painted.
6 rounds were played.
It all started of well.
Round One saw me playing against the canny Stephen Hopkins and his Later Achemidian Persians. I killed his general in about the 2nd or 3rd turn. Game over
BELOW: Set up.
BELOW: End game. Mortal combat between Darius and Paris. Hector cheers his younger brother on from his Red Chariot!

Round Two and I was facing David Lawrence and his Pre-Fudal Scots.
BELOW: Battlelines crash. On the far right Hector and his Auxilia and an element of light archers (Ps) gang up on the Scot's King. One moment he's there,....
 BELOW: .... and the next moment he's gone!
It was another rather quick game and another win for my Trojans.  Yet again another enemy General was dispatched. Hector was now dragging two corpses behind his chariot.
Round Three and the wheels fell off; literally! I was facing Brenton Searle and his East Frankish.
This was a nightmare match up for me. His Foot (Spears and Blades) overmatched my Spears and single Blade, and his Knights overmatched my Chariot Cavalry. I lose.
 ABOVE and BELOW: The East Frankish horde proves too much for Hector and the lads, "sigh"

Round Four and we’re back on track with a hard fought win over Central Asian City States ably commanded by Steven Vassalo.
 ABOVE: A hasty redeployment of my chariots was called for after a overly complex initial deployment.
BELOW: Hector scores a breakthrough,....
 BELOW: .... And sweeps in behind the the CACS cavalry line to clinch victory!

Round Five and I was up against Jason Dickie and his Italian Condotta. A tough game for me due to Jason’s abundance of Knights, Bow, and Spear (with a Light Horse element and some Blade also IIRC).
I was blessed with an abundance of pips, so was able to work a flank and clobber his Bow and eventually it was sudden death for us both, being 3 elements each down.
 ABOVE and BELOW: My initial deployment. Using the wood as cover I move my blades (dimounted Chariots) to threaten Jason's flanks.
 BELOW: The battle goes down to the wire with the final combat going Jason's way. A loss, but with honour.
Jason won the 50-50 contest and took the game, (but only just).
Round Six and I was playing Later Imperial Romans, (East).
This was another tough game that could have gone either way and ended up going the wrong way for me.
 ABOVE and BELOW: The combined arms killing machine that is the Later Roman Army proves to hard a nut to crack. Blades and Knights prove too much,...

All in all a great day of DBA gaming with a podium finish for Hector and the Lads!
Results were as follows: 
Brenton Searle – 1st III/52 East Frankish – 42 points
Lawrence Greaves 2nd – II/78b Late Imperial Roman (East) – 42 points
Scott Driscoll (Me) 3rd – I/26b Trojan – 34 points 
Gentleman’s Award – Steve Vassalo (by a very clear majority of votes)
Magister Militum – (Highest Adjusted Score) – Steve Hopkins
Executioner Award (most kills in a game) – Jason Dickie (with 7 kills)

 ABOVE and BELOW: Just two photos of other games nearby.

Cheers for now.
Comments Welcomed.


Friday, June 1, 2012

Battle At Gunnersburg: A MAURICE AAR

ABOVE: Stan's Notables for the Battle.
ABOVE: My Left Wing. Four Infantry Regiments "Vorwarts kinder"!

Hi Team
I thought I'd take the opportunity to share another After Action Report (AAR).
This time its a MAURICE Game report. I don't have any 'Lace War' armies in 18mm at present, but fortunatly MAURICE can be used for battles from The Monmouth Rebellion of 1685 right up to the Battles of the French Revolution. It's also a great set of rules to use with your Imagi-Nation Armies. So with that in mind Stan and I decided to create two late 18th century Imagi-Nations. For this game I'll be using my 1806 Prussians as the Imagi-Nation '1780ish Germanic' State I will call 'The Electorate of Clements Unt Edwarts'.
My 100 point Army will look like this:
6 REGULAR TRAINED Infantry
3 REGULAR TRAINED Cavalry
1 IRREGULAR Infantry (Volunteer Jaeger)
4 Artillery
National Advantages are:
Clerics (They are a pious lot)
Lethal Volleys
Artillery Academy
Notables:
We will draw the 'randomly' at the start of the game.

Some notes on Army composition. I made INFANTRY my dominate arm as I believe they are more powerful and versatile in this period than cavalry. 6 infantry Units (Regiments or Battalions) will give me ample firepower when combined with 4 Artillery units (Batteries). Add 'Artillery Academy' and 'Lethal Volleys'  to the mix (the ability to 'Re-Roll' and failed disruption) andI think defensivly the Army's firepower is quite deadly. All this firepower does come at a cost, and it means only 3 trained cavalry could be purchased and NO units could be upgraded to ELITE. What you end up with is a rather defensive army but with good firepower (and with some luck with terrain) I would be happy to defend with this army. If I did end up as an attacker, then as such I would be entitled to the support of a Mercenary unit on either Infantry of cavalry so would increase my stock of horsemen that way. The single unit of Irregular infantry would help me either garrison a town, village or bad terrain if defending, or support an attack.

Stan created the Free State of Northern Virginia, (FSoNV) looking very much like a mix of American Revolutionary War British and Continental Regiments? Apparently they have no issues with taxation without representation,.. meh.
BELOW: Stan's 'National Advantage' Cards:
We drew a 'PLAINS' battlefield card, and Stan chose to DEFEND. I selected an additional mercenary uint of Cavalry.  I drew the Notables Jaime de Laura and Thomas Burbess, Esq.
ABOVE: My National Advantage Cards: Artillery Academy and Lethal Volleys would be of assistance in ensuring that Hot Lead rather than Cold Steal would be the form of combat we would trust in, (other than God of course). The Clerics were to help ensure we got God's assistance also.
BELOW: My Left Wing. 4 Regiments of Electorate Infantry.
My Plan: As can be seen below the battlefield was rather open in the center. The enemy's right flank was dominated buy a large town (Gunnersburg) which was my objective for the battle. Stan garrisoned it with two ELITE Infantry regiments (Highlanders and Hessians) and placed another two TRAINED regiments (FSoNV'Continentals') directly behind the town. Next in line to the left of Gunnersburg was a Regiment of 'English' foot, neatly sitting between Gunnersburg and a hill in the center (called Battery Hill). On the hill was two small Artillery batteries with a Battalion of 'English' Foot and the enemy CinC. Stans final regular Infantry Regiment of English Foot were deployed behind the hill. Stan's left flank consisted of three regiments of Cavalry (Light Dragoons and Dragoons) in a '2 up and 1 in support' formation. Finaly on Stan's extreme left was a sole regiment of Irregulars, ('Rangers' I think).
BELOW: Deployment
I soon concluded that I was not going to try an win by taking the objective. Storming Gunnersburg with trained infantry against ELITES with Lethal Volleys was not my idea of a pleasant night at the Warrant Officers and Sergeant's Mess. No, I would win by destroying Stan's left flank and then rolling up the center. Once the garrison witnessed this they would simply 'leave Dodge (ok, Gunnersburg) and we would simplly march in and have warm beds and roofs over our heads.

THE BATTLE:
The Elector gathered his Officers and RSMs around him: "Hmmm ze Virginians and their English friends are very determined not to allow us to take ze town. He has all his best infantry in there. Ve have some superiority in Horse, and ve have good ground to mass our artillery in ze center. Our plan will be to threaten his left. If, when he weakens his center to sure up his left I will march two Regiments of Foot onto Battery Hill and swing either left or right. Right if our cavalry need support, or left to threaten the town. Mr Burgess Sir, you will have a great part to play in my plan. All hinges on ze Horse getting through ze bad terrain quickly. Do not tarry. Vorwarts Ja! Ja, a good plan"! 
BELOW: The two Regiments of Foot that would be tasked with siezing Battery Hill. Michael's Regiment of Foot (Red Flag) and supported by Mathilda's Musketeers (Green Flag). You can just see on of the batteries that formed my Grand Battery in the center of the battlefield to the left of the two Regiments of Foot).
BELOW: My Cavalry mass on my right. Their Notable was able to help them march through the bad going to their front without suffering any disruption. Vital to the success of my plan.
Below: Von Baily's Volunteer Jaeger. My only irregular troops.
The battle opend with a march by my massed cavalry under my notable. They didn't manage to completely clear the bad terrain to their front, but got far enough that thay would be able to get out of it befor having to confront the FSoNV horse. As expected, Stan countered by advancing his horse.
My next move saw my cavalry clear the bad terrain. I now had four Regiments of horse in Mass formation facing two of Stan's Horse Regiments in line, with one in support. Stan's Regiment spured themselves forward, playing a 'Stirrups In' card. The result was both of his Regiments recoiling, but not without inflicting some disruption. Stan's Infantry Regiment behind Battery Hill moved off in march column to come to the assistance of his Cavalry.
BELOW: The mighty clash of horse flesh on my right flank.
Now that the enemy was well committed to my right flank I opend up a bombardment on the lone English Regiment between the town of Gunnersburg and Battery Hill.  The results were impressive. 4 disreuptions! Obviously time spent at the Artillery Academy was well spent.
Above: The Grand Battery Opens Fire!
Below. The battle developes at the bottom of the picture we see the clash of cavalry. One of Stans small batteries on Battery Hill fires at canister range into my left most Regiments of horse, (Prince Peter's Cuirassiers). By contrast to my artillery, Stan's small battery did little harm. In the center my Grand Battery bombards the infantry between Gunnersburg and Battery Hill. Both of my Infantry Brigades are starting to advance.
After another round of combat on my right flank, both of Stan's lead Light Dragoon regiments were destroyed. Stan's last Horse Regiment charged forward into Prince Peter's Cuirassiers and routed them, but not before sustaining disruption of their own and the tragic loss of Michael von Pfanenstiel as the RSM of Prince Peter's Regiment decapitated him with a deft backhanded slash of his saber,... HUSSAR!! The Rash Saxon's headless body was last seen upright and still in the saddle heading towards Von Baily's Volunteer Jaegers!
Above and Below: The cavalry battle reaches it's climax!
Stan's brave Blue Coated Dragoons attempt to hold back the rampant Horse Regiment's of the Electorate of Clements Unt Edwarts. Behind the last brave FSoNV Blue Coated Dragoons you can see the English Foot Regiment coming to the rescue; "Stout Fellows!!! BRAVO"! 

Stan's Army Moral was looking shakey. I now committed my two central Infantry Regiments to the task at hand. "Vorwarts!! Schnell! Take the hill Mein Kindder"! Meanwhile, Stan decided the best form of defence was attack and calling on all the precision drill trickery he could must sent the two Regiments of Foot behind Gunnersburg on a flanking march to attempt to envelope my left. On my right flank he formed line with the sole English Regiment of Foot and unleashed crashing volley after crashing volley into my horse. The Mercenary Regiment of Von Stammer's Dragoons had had enough for the day and dashed off to the rear as fast as their horses could carry them, and soon the much depleated Electors Cuirassiers followed them. Only Raechel's Hussars remaind in position.
BELOW: My Regiments of Foot on my left flank demonstrate before Gunnersburg. These regiments spent the day singing hymes and looking menacing, but not much else.
 
BELOW: Looking through Gunnersburg towards my lines.
BELOW: The English Foot Regiment marches towards Stan's left flank in a vain attempt to either save the Blue Coated Dragoons or save the left flank.
Stan plated one last trick, and by that I mean a: "That's Not On The Map" card. Just as my lead Regiment got to the foot of Battery Hill they discovered a marsh. "S#&T!!! They halted and delivered a lethal volly into the small battery before them, killing or wounding almast every gunner present. Then, with a mighty "HURRAH" charged across the marsh and onto the hill, overrunning the 2nd battery. This was enough to break the FSoNV army, and victory was secure.
BELOW: "OK, whoever did recon is in sooooo much crap,..."!
ABOVE: Mathilda's Musketeers aproach the marsh. Ahead Michael's Regiment are on the hill. Micheal's Regiment took heavy casualties in the process. 
BELOW: My CinC advances to encourage the men.
ABOVE: End Game. Michael's Regiment of Foot (Red Flag) take the hill supported by Mathilda's Musketeers (Green Flag).
BELOW: Micheal's Regement of Foot on the hill. They were expecting a volley, but fortunatly the enemy retired from the hill. A good thing for them, as they already had 3 Disruption on them.

ABOVE: Von Baily's Volunteer Jaeger. They spent the entire battle as spectators. But they do have flash uniforms!
Another cracking good game of Maurice. All done and dusted in 2 hours and 10 minutes.
I can't recommend these rules highly enough.  
All my miniatures are the magnificent AB MINIATURES available from EUREKA MINIATURES. Stans army was a mix af MINIFIGS, ESSEX and some AB MINIATURES, (The brave Blue Coated Dragoon and his Officers).
Stan's army was painted predominatly by FERNANDO ENTERPRISE, (and most bases still require flocking)
I painted my army.
The FLAGS are free downloads available at WARFLAGS, (see link at right).
Comments welcomed.
P.S. Sorry for the poor quality of some of the photos. We played the game at our Warrant Officers and Sergeants Mess. A very plesant night was had.